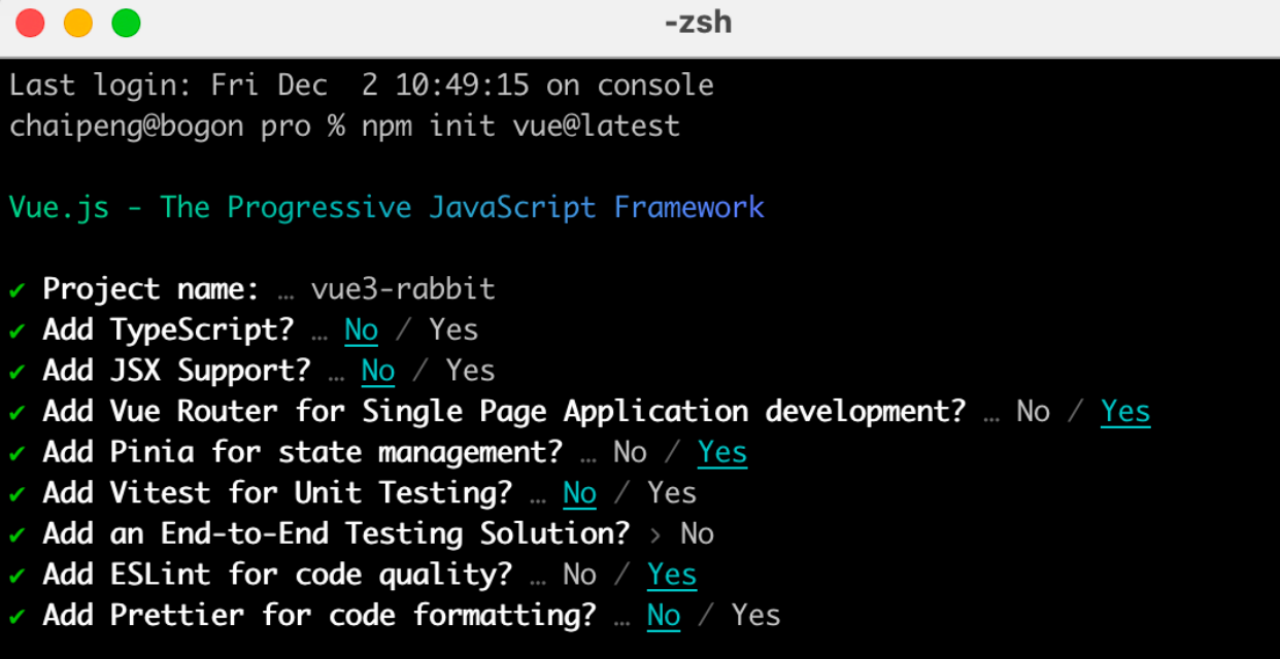
创建项目并整理目录

git 管理项目 我放到gitee进行管理
什么是别名路径联想提示
在编写代码的过程中,一旦输入 @/,VSCode会立刻联想出src下所有子目录和文件,统一文件路径访问不容易出错
配置如下:
jsconfig.json配置别名路径
配置别名路径可以在写代码时联想提示路径
1
2
3
4
5
6
7
8
| {
"compilerOptions" : {
"baseUrl" : "./",
"paths" : {
"@/*":["src/*"]
}
}
}
|

elementPlus引入

看文档如何 按需导入
1. 安装elementPlus和自动导入插件
1
2
| npm install element-plus --save
npm install -D unplugin-vue-components unplugin-auto-import //D : 在开发环境中引入
|
2. 配置自动按需导入
1
2
3
4
5
6
7
8
9
10
11
12
13
14
15
16
17
|
import AutoImport from 'unplugin-auto-import/vite'
import Components from 'unplugin-vue-components/vite'
import { ElementPlusResolver } from 'unplugin-vue-components/resolvers'
export default defineConfig({
plugins: [
AutoImport({
resolvers: [ElementPlusResolver()],
}),
Components({
resolvers: [ElementPlusResolver()],
}),
]
})
|
3. 测试组件
1
2
3
| <template>
<el-button type="primary">i am button</el-button>
</template>
|
定制elementPlus主题

1. 安装sass
基于vite的项目默认不支持css预处理器,需要开发者单独安装
2. 准备定制化的样式文件
从elementplus 下载
1
2
3
4
5
6
7
8
9
10
11
12
13
14
15
16
17
18
19
20
21
22
23
24
25
|
@forward 'element-plus/theme-chalk/src/common/var.scss' with (
$colors: (
'primary': (
'base': #27ba9b,
),
'success': (
'base': #1dc779,
),
'warning': (
'base': #ffb302,
),
'danger': (
'base': #e26237,
),
'error': (
'base': #cf4444,
),
)
)
|
3. 自动导入配置
这里自动导入需要深入到elementPlus的组件中,按照官方的配置文档来
- 自动导入定制化样式文件进行样式覆盖
- 按需定制主题配置 (需要安装 unplugin-element-plus)
1
2
3
4
5
6
7
8
9
10
11
12
13
14
15
16
17
18
19
20
21
22
23
24
25
26
27
28
29
30
31
32
33
34
35
36
37
38
39
40
41
42
43
44
45
46
| import { fileURLToPath, URL } from 'node:url'
import { defineConfig } from 'vite'
import vue from '@vitejs/plugin-vue'
import vueDevTools from 'vite-plugin-vue-devtools'
import AutoImport from 'unplugin-auto-import/vite'
import Components from 'unplugin-vue-components/vite'
import { ElementPlusResolver } from 'unplugin-vue-components/resolvers'
export default defineConfig({
plugins: [
vue(),
vueDevTools(),
AutoImport({
resolvers: [ElementPlusResolver()],
}),
Components({
resolvers: [
ElementPlusResolver({ importStyle: "sass" })
],
}),
],
resolve: {
alias: {
'@': fileURLToPath(new URL('./src', import.meta.url))
},
},
css: {
preprocessorOptions: {
scss: {
additionalData: `
@use "@/styles/element/index.scss" as *;
`,
}
}
}
})
|
axios安装并简单封装
1. 安装axios
2. 基础配置
官方文档地址:https://axios-http.com/zh/docs/intro
基础配置通常包括:
- 实例化 - baseURL + timeout
- 拦截器 - 携带token 401拦截等
1
2
3
4
5
6
7
8
9
10
11
12
13
14
15
16
17
18
19
20
| import axios from 'axios'
const http = axios.create({
baseURL: 'https://pcapi-xiaotuxian-front-devtest.itheima.net/home/category/head',
timeout: 5000
})
instance.interceptors.request.use(config => {
return config
}, e => Promise.reject(e))
instance.interceptors.response.use(res => res.data, e => {
return Promise.reject(e)
})
export default http
|
3. 封装请求函数并测试
1
2
3
4
5
6
7
| import http from '@/utils/http'
export function getCategoryAPI () {
return http({
url: 'home/category/head'
})
}
|
如果不同的业务模块需要的接口基地址不同,该怎么做?
1
2
3
4
5
6
7
8
| const http1 = axios.create({
baseURL: 'https://pcap2i-xiaotuxian-front-devtest.itheima.net/home/category/head',
timeout: 5000
})
const http2 = axios.create({
baseURL: 'https://pcapi-xiaotuxian-front-devtest.itheima.net/home/category/head',
timeout: 5000
})
|
路由整体设计

路由设计原则:找页面的切换方式,如果是整体切换,则为一级路由,如果是在一级路由的内部进行的内容切换,则为二级路由
1
2
3
| <template>
我是登录页
</template>
|
1
2
3
| <template>
我是首页
</template>
|
1
2
3
| <template>
我是home
</template>
|
1
2
3
| <template>
我是分类
</template>
|
1
2
3
4
5
6
7
8
9
10
11
12
13
14
15
16
17
18
19
20
21
22
23
24
25
26
27
28
29
30
31
32
33
34
35
|
import { createRouter, createWebHistory } from 'vue-router'
import Login from '@/views/Login/index.vue'
import Layout from '@/views/Layout/index.vue'
import Home from '@/views/Home/index.vue'
import Category from '@/views/Category/index.vue'
const router = createRouter({
history: createWebHistory(import.meta.env.BASE_URL),
routes: [
{
path: '/',
component: Layout,
children: [
{
path: '',
component: Home
},
{
path: 'category',
component: Category
}
]
},
{
path: '/login',
component: Login
}
]
})
export default router
|
静态资源引入和Error Lens安装

1. 静态资源引入
- 图片资源 - 把 images 文件夹放到 assets 目录下
- 样式资源 - 把 common.scss 文件放到 styles 目录下
2. Error Lens插件安装

scss变量自动导入

1.新增一个var.scss 文件 存入色值变量
2.通过vite.config.js 配置自动导入文件
1
2
3
4
5
| $xtxColor: #27ba9b;
$helpColor: #e26237;
$sucColor: #1dc779;
$warnColor: #ffb302;
$priceColor: #cf4444;
|
1
2
3
4
5
6
7
8
9
10
11
| css: {
preprocessorOptions: {
scss: {
additionalData: `
@use "@/styles/element/index.scss" as *;
@use "@/styles/var.scss" as *;
`,
}
}
}
|
测试
1
2
3
4
5
6
| <style scoped lang="scss">
.test {
color: $priceColor;
}
</style>
|